A broken or noisy garage door motor can make everyday use of the garage difficult. Replacing it might sound hard, but with the right help, it becomes a project you can handle. It just takes patience, basic tools, and a safe work area.
This guide shows how to change the garage door motor by walking you through each step. You will learn how to disconnect the power, remove the old unit, mount the new motor, and test the system. Safety tips and tool lists are also included to make the job easier.
Doing it yourself can save money and teach you more, but it’s not always safe. If you feel unsure, it’s better to call a garage door repair expert for help.
Professionals use the right tools and skills to safely fix motors, reduce risks, and ensure the job is done correctly.
Why Would You Need to Replace a Garage Door Motor?
Garage door openers are built to last, but like any mechanical device, they wear out over time. Here are common signs that your motor needs replacement:
1. Unusual Noises from the Motor
Grinding, screeching, or clunking sounds coming from your garage door opener usually mean something’s not right inside. These strange noises can be caused by damaged parts, loose components, or a lack of lubrication. Addressing the issue early can help prevent more costly repairs.
2. Garage Door Moves Slowly
If your garage door opens or closes more slowly than normal, the motor might be getting weak. Dust buildup, old parts, or low power could be the reason. Solving the problem quickly helps keep your garage door running smoothly every day.
3. Door Doesn’t Respond Consistently
When your garage door works inconsistently, even when the remote batteries are fine, something may be wrong. This kind of problem can be caused by signal issues, faulty wiring, or sensor trouble. It’s a good idea to have it checked.
4. Garage Door Motor Doesn’t Work at All
If the motor doesn’t respond and the door won’t move, even when operated manually, the issue may be serious. It could be a burned-out motor, broken wires, or total failure. Call a garage door repair professional to identify and resolve the issue.
Tools Checklist for Changing a Garage Door Motor
Before starting, gather these essential tools:
- Socket wrench set: For loosening and tightening bolts.
- Screwdrivers: Use a flathead and Phillips for removing screws.
- Pliers and wire cutters: For cutting wires and gripping parts.
- Ladder: To reach the motor unit safely.
- New garage door motor: Make sure it fits your door.
- Adjustable wrench: Helps with different bolt sizes.
- Safety gloves and goggles: Protect your hands and eyes.
Having everything ready before you begin ensures a smoother process.
Step-by-Step Guide to Replacing Your Garage Door Motor
Replacing your garage door motor may seem tricky, but this simple step-by-step guide makes the process transparent, safe, and effective.
Step 1: Disconnect Power
Start by cutting off the power to the garage door opener. Unplug it from the wall outlet or turn off the circuit breaker if it’s hardwired into your home’s system.
This step keeps you safe from electrical shocks or sudden movement. Always double-check that the opener is completely off before touching any parts to prevent accidents during the motor replacement process.
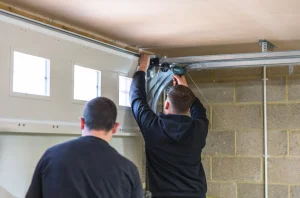
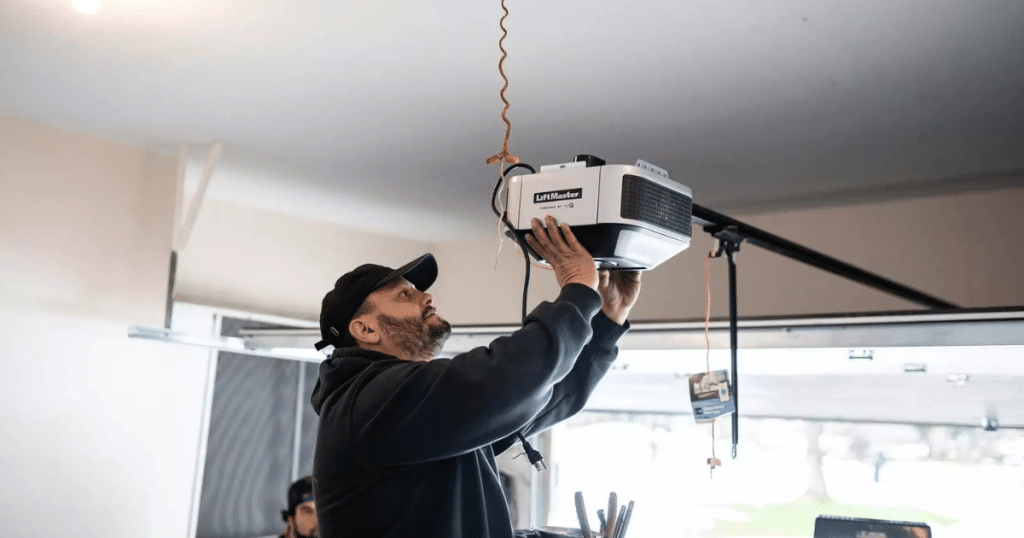
Step 2: Detach the Old Motor
Locate the old motor mounted on the ceiling. Remove its protective cover to expose internal parts and wiring. Take a photo of the wiring for easier reassembly later with the new unit.
Next, carefully disconnect all the wires. Unscrew the mounting bolts using a wrench or socket. Support the motor as you lower it gently to avoid damage or injury while removing it from the ceiling.
Step 3: Install the New Motor
Lift the new garage door motor into position. Align it with the existing brackets or holes where the old motor was placed. Secure it with bolts to hold it firmly in place.
Use the reference photo to reconnect all wires exactly as they were. Tighten connections to avoid electrical issues later. Make sure the unit feels stable and double-check that everything is connected properly.
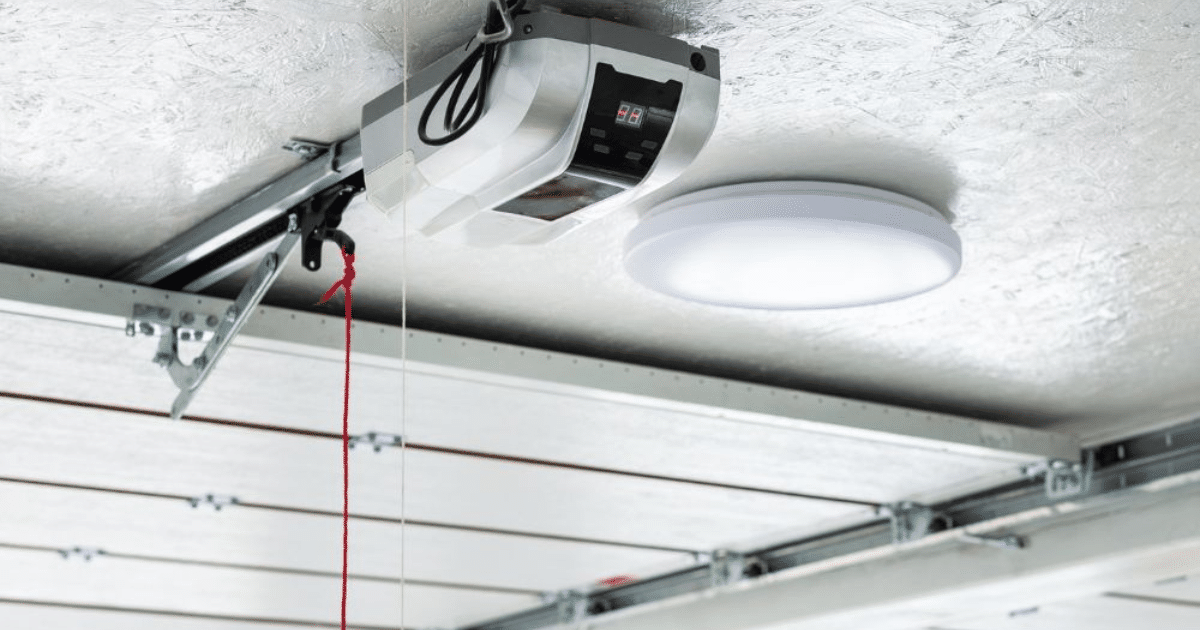
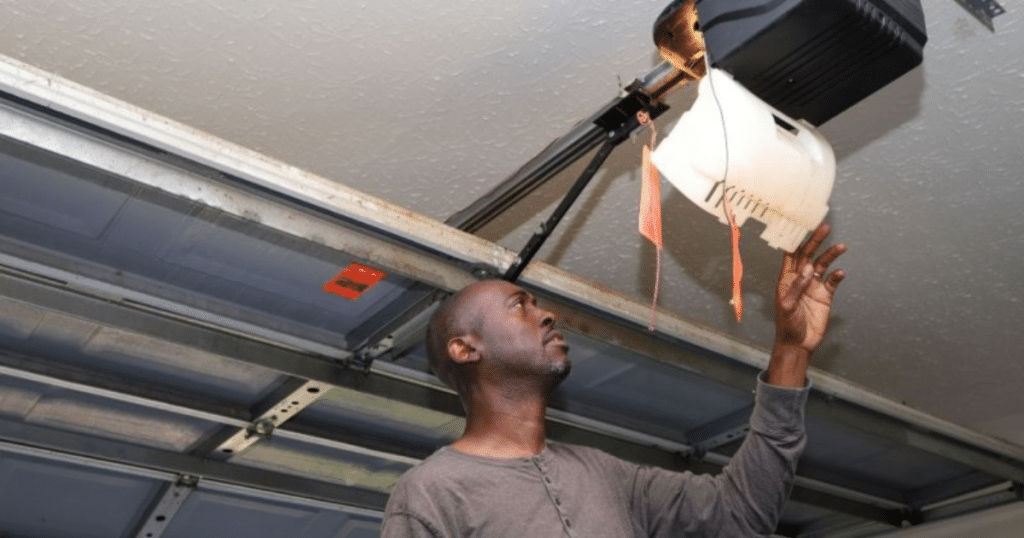
Step 4: Reattach the Drive Mechanism
Identify your drive system, whether it’s belt, chain, or screw drive. Reconnect it to the new motor following your model’s instructions. This allows the opener to move the garage door smoothly.
Adjust the tension so it’s not too tight or too loose. Incorrect tension can cause jerky movement or stress the motor. Use your manual as a guide for proper adjustment settings.
Step 5: Reconnect Power and Test
Restore power by plugging in the opener or flipping the breaker switch back on. Use the wall button or remote to test the garage door’s opening and closing.
If the door doesn’t move smoothly or stops midway, adjust the force and travel settings. These controls are usually located on the motor housing and help fine-tune performance.
Step 6: Reinstall the Cover
Once you’ve tested the opener and everything works, put the cover back on the motor. Secure it with screws to protect the parts inside from dust and debris.
Organize any loose wires using clips or zip ties. Keeping everything neat not only looks better but also makes the system safer and easier to maintain in the future.
Safety Tips to Remember When Changing a Garage Door Motor
Always put safety first when working on a garage door motor. Follow these important tips to avoid injury and damage:
1. Disconnect Power First
Before working on any garage door opener or motor parts, unplug the system or turn off the power at the breaker. This prevents accidental activation while you’re fixing or inspecting components. Cutting power ensures your safety and avoids electrical shock or equipment damage.
2. Get a Partner’s Help
Garage doors and their parts are heavy and difficult to handle alone. Having someone help keeps the job safer and faster. A partner can hold items steady, pass tools, and prevent injuries while you repair or adjust your garage door system.
3. Don’t Touch the Springs
Torsion or extension springs are tightly wound and can snap if mishandled. These parts hold high tension and may cause serious injury. Unless you’re trained, leave spring repairs to professionals to avoid dangerous accidents and ensure your door stays balanced.
4. Use Safety Gear
Always wear gloves, safety glasses, and sturdy shoes when working on garage doors. These protective items help prevent injuries from sharp edges, rusted hardware, or falling tools. Even minor repairs can be risky, so safety gear should always be used.
Mistakes People Make When Changing Garage Door Motor
Here are the most common mistakes to avoid when handling garage door maintenance or repairs. These tips help ensure safety and smooth performance:
1. Skipping the Manual
Every garage door motor model works a bit differently. Ignoring the manual can lead to mistakes during setup or repair. Always follow the manufacturer’s instructions to ensure everything is installed, wired, and adjusted correctly for safe and smooth operation.
2. Ignoring Sensor Alignment
Misaligned garage door sensors are a common reason the door won’t open or close properly. If the sensors aren’t facing each other or are blocked, the system may stop working. Take time to align them correctly for reliable performance and safety.
3. Forgetting to Lubricate
Once your garage door motor is installed, don’t forget to apply lubricant. Use a silicone-based spray on rollers, hinges, and other moving parts. Lubrication reduces friction, helps parts last longer, and ensures your garage door runs quietly and efficiently.
When to Call a Professional to Change a Garage Door Motor
While many homeowners can handle this project, some situations require expert help:
- If the door is excessively heavy or has broken springs.
- If electrical wiring seems complex or unsafe.
- If the motor replacement doesn’t resolve operational issues.
Expert Help Just a Call Away: Make Your Garage Door Like New Again
A loud or broken garage door motor can make daily use hard. Changing it fast helps prevent bigger problems. A smooth motor gives you better access, added safety, and quiet performance every time you open your garage door.
Learning how to change a garage door motor is useful, but doing it correctly requires care. You need proper safety steps, the right tools, and some know-how. If done incorrectly, it could damage your system or cause injury. It’s better to let trained experts handle the job.
Call a garage door repair expert now for fast and safe service. Anytime Garage Doors fixes motors with care, using good tools and trusted parts. Your garage door will operate better, last longer, and run more quietly. Call today and get it fixed quickly.
FAQs on How to Change a Garage Door Motor
End Note
If you’re unsure how to change a garage door motor safely, Anytime Garage Doors offers expert service and quality parts. Our technicians provide quick, reliable upgrades that restore smooth function and help extend your garage door’s performance and lifespan.
Discover our premium openers and operators, designed for both strength and quiet performance. We also install Wayne Dalton garage doors to boost style and security. Whether replacing a motor or upgrading your whole system, we provide professional service every step of the way.
Schedule your repair through our contact page, explore updates on Instagram, or find us on Google Maps for fast and friendly help. We’re ready to keep your garage door running like new with trusted repair and installation services.
Anytime Garage Doors
N70W25156 Indian Grass Ln # B, Sussex, WI 53089, United States
+12622463680